Steps:
- Intro
- VSO
- Docker
- xUnit
- Build
- Back end
- Selenium
- Docker
- Release Management
- Testing
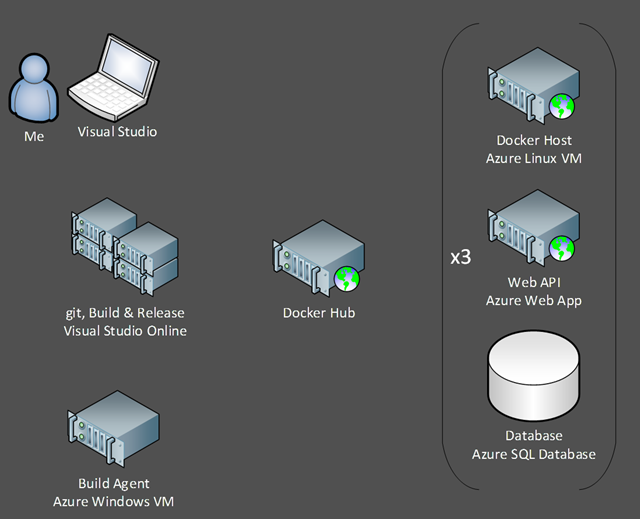
While preparing this post, I realized I had not shown the
entire system of what we are trying to assemble. Below is an image of what we
are building.
Our next goal is to begin creating our build definition in Visual
Studio Online (VSO). Because ASP.NET 5 is still in preview, our build machines
require some additional steps to be able to build ASP.NET 5 projects. We perform
those steps via PowerShell. In this post, we will create the required
PowerShell and configure our build.
To build an ASP.NET 5 project, you must have a .NET
Execution Environment (DNX). The DNX is an SDK and runtime environment that enables
you to build and run .NET applications on Windows, Mac, and Linux. By default,
this will not be on build agents, so we are going to create a PowerShell script
that will install it for us. Very similarly to build, testing an ASP.NET 5
application requires special care. We are going to employ a second PowerShell
script to execute our tests.
-
Add Install_DNX.ps1 file to your Solutions Items Folder
-
Open Solutions Explorer in Visual Studio
-
Right-click on the Solutions Items folder
-
Select Add / New Item…
-
Add a new text file and name it Install_DNX.ps1
-
Copy and paste the code below into the file
# bootstrap DNVM into this session.
&
{$Branch='dev';iex ((new-object net.webclient).DownloadString('https://raw.githubusercontent.com/aspnet/Home/dev/dnvminstall.ps1'))}
# load up the global.json so we can find the DNX version
$globalJson
= Get-Content -Path $PSScriptRoot\global.json
-Raw -ErrorAction
Ignore |
ConvertFrom-Json -ErrorAction
Ignore
if ($globalJson)
{
$dnxVersion =
$globalJson.sdk.version
}
else
{
Write-Warning
"Unable to locate global.json to determine using 'latest'"
$dnxVersion =
"latest"
}
# install DNX
# only installs the default (x86, clr) runtime of the framework.
# If you need additional architectures or runtimes you should add additional calls
# ex: & $env:USERPROFILE\.dnx\bin\dnvm install $dnxVersion -r coreclr
&
$env:USERPROFILE\.dnx\bin\dnvm
install $dnxVersion
-Persistent
# run DNU restore on all project.json files in the src
folder including 2>1 to redirect stderr to stdout for badly behaved tools
Get-ChildItem
-Path $PSScriptRoot
-Filter project.json
-Recurse | ForEach-Object { &
dnu restore
$_.FullName
2>1 }
-
Add RunTests.ps1 file to your Solutions Items Folder
- Open Solutions Explorer in Visual Studio
- Right-click on the Solutions Items folder
- Select Add / New Item…
- Add a new text file and name it RunTests.ps1
-
Copy and paste the code below into the file
Set-ExecutionPolicy
unrestricted -Scope CurrentUser
-Force
# Setup the dnx and add it to your current path
dnvm setup
# Set runtime to use
dnvm use 1.0.0-beta7
# Run the test
dnx test
-
Commit and Push our changes to VSO
With all the files in place, we can begin creating our build.
-
Create new Visual Studio Build
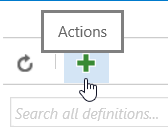
- Visit the Build hub of your VSO project
-
Click the Actions link
- Select the Visual Studio build template
- Click Next
- Change Default agent queue to Default
- Check the check box for Continuous Integration
- Click Create
-
Add PowerShell step to top of build to run Install_DNX.ps1
- Click + Add Build step…
- Select PowerShell from the Utility section
- Drag and drop this step from the bottom to the top of the list of steps
- Click the browse button for the Script filename
- Select the Install_DNX.ps1 file
This will ensure our build agent has everything it needs to
be able to build our code. Now we need to repeat this process to run our
tests.
-
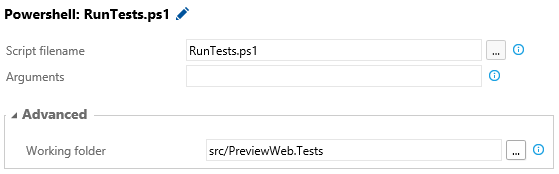
Add PowerShell step after Visual Studio Test step to run RunTests.ps1 with a working directory of your test project
- Click + Add Build step…
- Select PowerShell from the Utility section
- Drag and drop this step under the Visual Studio Test step
- Click the browse button for the Script filename
- Select the RunTests.ps1 file
- Expand the Advanced section
- Click the browse button for the Working folder
-
Select the folder of your test project
-
Add a task to publish the test results
- Click + Add Build step…
- Select Publish Test Results from the Test section
- Drag and drop this step from the bottom to under the PowerShell step we added to run the tests
- Set the Test Result Format to Xunit
-
Set the build configuration to Release
- Click the Variables tab
- Change debug to release for the BuildConfiguration variable
-
Save your build
- Click Save
- Give your build a name
- Click OK
-
Queue a build
- Click Queue build...
- Click OK
Do not be alarmed by the “No test assemblies found”
warning. That will go away once we add the Web API to access our SQL Azure
Database in future posts.