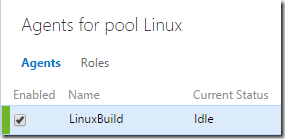
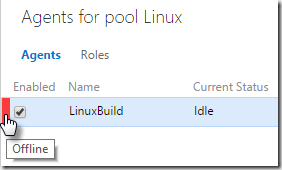
I have tried and failed several times to install the VSTS build agent on Ubuntu so I thought I would write a post on how I got it to work. I will be using putty.exe to connect to the VM.
Install Java
Later we are going to install Maven that relies on Java, so we are going to install the latest version of Java now.
sudo add-apt-repository ppa:webupd8team/java
sudo apt-get update
Now we can actually install Java.
sudo apt-get install oracle-java8-installer
During the installation, you’ll be asked to agree to the license and then the installer starts downloading Java files from the Oracle website and installs it on your system.
Now we need to set the default version of Java to use.
sudo apt-get install oracle-java8-set-default
Verify Java
To verify that Java was installed successfully, run the following command:
java -version
Your output should be similar to the output below.
$ java -version
java version "1.8.0_72"
Java(TM) SE Runtime Environment (build 1.8.0_72-b17)
Java HotSpot(TM) 64-Bit Server VM (build 25.72-b15, mixed mode)
Install Node.js
To install the agent you first need to install Node.js on your Linux box. One thing to be aware of on Ubuntu servers is that because of a conflict with another package, the executable from the Ubuntu repositories is called nodejs instead of node. To fix this you can build node yourself with nvm and it will be node as you expect. That is the route we are going to take. To begin we need to install the tools to build node.
sudo apt-get update
sudo apt-get install build-essential libssl-dev
Now we just need to get the installation script from GitHub. At the time of this writing, the latest tag was v0.30.1.
curl https://raw.githubusercontent.com/creationix/nvm/v0.30.1/install.sh | sh
source ~/.profile
After, you will need to reboot your server.
sudo reboot
Now you can see what the latest version of node is by running this command.
nvm ls-remote
At the time of this writing, the latest version was v5.7.0. To install that version, run the following command.
nvm install 5.7.0
We want this to be the default version.
nvm alias default 5.7.0
Verify Node.js
To verify that node and npm were installed successfully, run the following command.
node -v && npm -v
Your output should be similar to the output below.
$ node -v && npm -v
v5.7.0
3.6.0
$
The version of node (5.7.0) and the version of npm should be displayed.
Install Maven
We are doing to also install maven so we have a build engine on this agent. Simply run the command below. Note that this command can take a long time to complete.
sudo apt-get install maven
Verify Maven
To verify that Maven was installed successfully, run the following command.
mvn -version
Your output should be similar to the output below.
$ mvn -version
Apache Maven 3.3.3
Maven home: /usr/share/maven
Java version: 1.8.0_72, vendor: Oracle Corporation
Java home: /usr/lib/jvm/java-8-oracle/jre
Default locale: en_US, platform encoding: UTF-8
OS name: "linux", version: "4.2.0-30-generic", arch: "amd64", family: "unix"
Install Agent Installer
We are going to need a way to authenticate the agent, so we have to create a Personal Access Token.
- Log into VSTS
- Click your name in the upper right-hand corner
![image_thumb[15] image_thumb[15]](http://donovanbrown.com/image.axd?picture=image_thumb%5B15%5D_thumb_1.png)
- Click My security
- Click Add under Personal access tokens
- Give the access token a name
- Select how long you want the token to be valid
- Select the accounts you want to be able to access this token
- Leave All scopes selected
- Click Create Token
- Copy the token value and store it somewhere safe

Installing Agent Installer
We are going to use NPM to install a Node Package that allows us to stamp out agents.
npm install -g vsoagent-installer
Stamping out Agent
Now that we have the Agent Installer, we can start stamping out agents.
- Create directory
mkdir a1
- Change to the directory
cd a1/
- Install Agent
vsoagent-installer
dbrown@LinuxBuild:~/a1$ vsoagent-installer
Installing agent to /home/dbrown/a1
Copying:  /home/dbrown/.nvm/versions/node/v5.7.0/lib/node_modules/vsoagent-installer/agent /home/dbrown/a1
Copying:  /home/dbrown/.nvm/versions/node/v5.7.0/lib/node_modules/vsoagent-installer/node_modules /home/dbrown/a1
writing: /home/dbrown/a1/package.json
writing: /home/dbrown/a1/run.sh
writing: /home/dbrown/a1/configure.sh
making scripts executable
Done.
Configure Agent
Now that we have an agent, we simply need to configure it.
node agent/vsoagent.js
| Field |
Value |
| Enter alternate username |
{Email you log into VSTS with} |
| Enter alternate password |
{Personal Access Token} |
| Enter server url |
https://{instance}.visualstudio.com |
| Enter agent name |
{Any Name} |
| Enter agent pool name |
{Existing Pool} |
| Enter force basic |
false |
Creating work folder ./_work ...
Creating env file /home/dbrown/a1/env.agent...
Saving configuration ...
2016-02-28T06:37:14.410Z: Agent Started.

At this point our agent is running. However, if we were to disconnect from our VM, the agent would stop. We are going to fix that next. For now, stop the agent by pressing Ctrl+C.
^C
Shutting down host.

Running Agent with Screens
The agent can’t be installed as a service on Linux. This limitation requires that you are connected to the VM for the agent to run. If you disconnect from the VM, the agent would stop working. We are going to use Screens to allow our agent to run even if we disconnect from the VM. We are going to create a window where we can start the agent and leave it running.
screen
Now that we are in a window, restart the agent.
node agent/vsoagent.js
Now that the agent is running, we are going to create another window so we can continue to use the VM.
- Press Ctrl+a
- Press c
You are now in a second window that allows you to continue to use your VM. If you want to, return to the agent:
- Press Ctrl+a
- Press n
You can repeat the lines above to return to the other window. While on the agent window, detach from the window:
- Press Ctrl+a
- Press d
Now you can safely close your VM connection and your agent will continue to run. When you reconnect to your VM, simply enter the following command to load the agent window.
screen -r